We all have something in our homes that we consider “trash” or “useless” and are about to throw away. There was a lot of that in my house too. Plastic bottles, old clothes, broken crockery, used tin cans… everything. Then one day, my daughter cut up a plastic bottle and started making her own pencil box. There was a strange sparkle in her eyes— the joy of making . That day, I realized that what we consider “trash” is actually a blank canvas on which we can paint the colors of our creativity.
I believe that upcycling isn’t just a way to save the environment, it’s also a form of therapy . There’s a tremendous sense of satisfaction in giving something new to your own hands. Plus, it doesn’t break the bank!
So today, let me share with you some of my cutest DIY upcycling projects and the stories behind them, all made from just about every day things.
1. Denim Floor Cushions
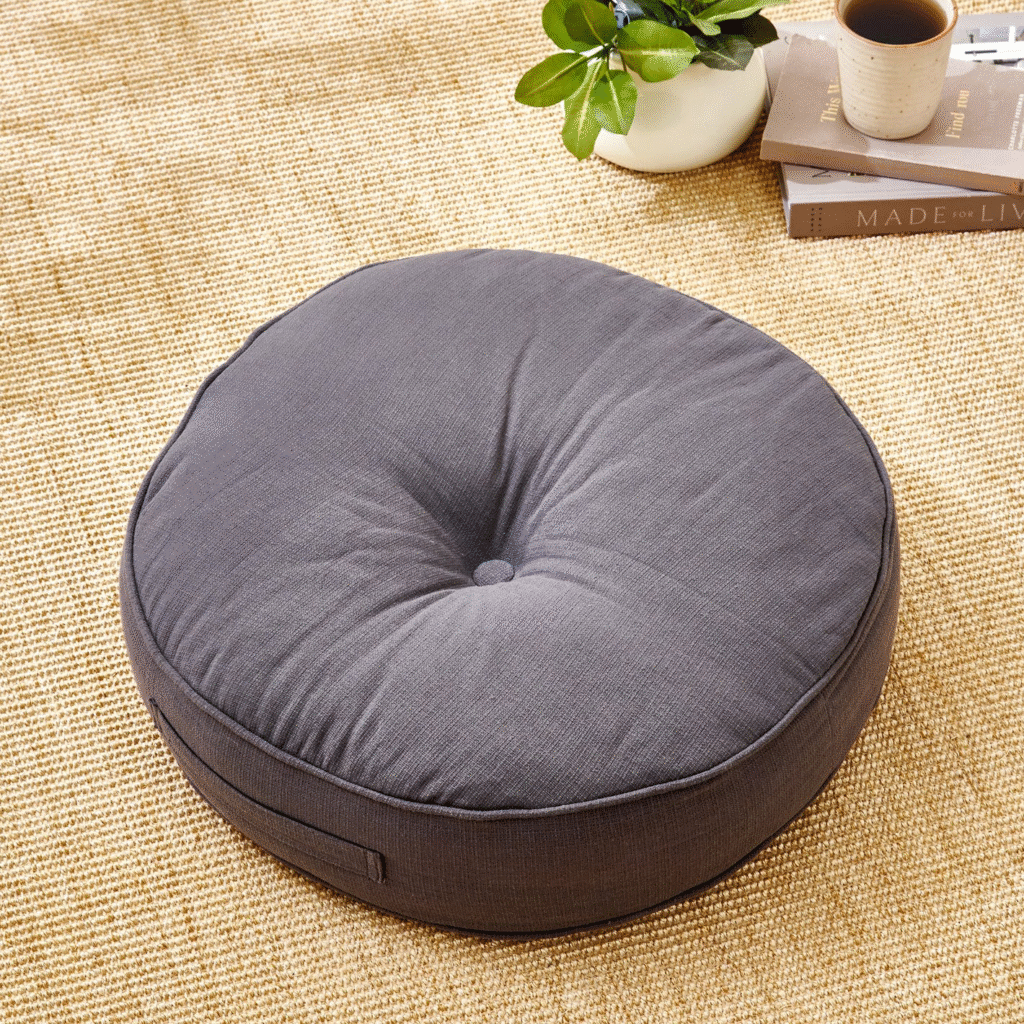
Junk: Four old jeans belonging to me and my husband, which were torn in places or were out of fashion.
Story: We were considering buying a new sofa, but both my budget and my love for the environment prevented it. I noticed that we often sat on the floor chatting or drinking tea. Then I came across a pair of old denim jeans in the closet. These jeans are so sturdy, why not use them for sitting?
My DIY Idea:
- I unzipped all the jeans and cut them into large square pieces.
- The strong seams of the jeans were used as small patches.
- These pieces were stitched together into a large, square cover. Each cover was designed slightly differently to give it an “artsy” touch.
- A strong cushion was prepared by filling it with old, torn sheets and pillows.
The result: Today, I have these denim floor cushions in my living room. They’re so comfortable that everyone, kids and guests alike, loves them. Everyone asks, “Where did you get these?” And when I tell them they’re my old jeans, their faces mix with surprise and joy. It’s not just a cushion; it’s a part of our nostalgia .
2. Tin Can Planters

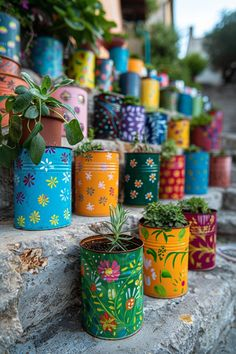
Junk: Empty coffee, biscuit and baby milk powder tins lying in the kitchen.
Story: I love gardening, but beautiful planters are very expensive. I wanted to give my little indoor plants new homes. I realized I had 5-6 tin cans of various sizes. I couldn’t bear to throw them away!
My DIY Idea:
- First, I thoroughly washed and dried all the containers.
- Using a nail and hammer, make 2-3 holes at the bottom of each container (for drainage).
- Then came the most fun part—painting them. I painted some containers with terracotta colors, and others with bright yellow and blue. Some featured dot patterns, others with leaves.
- Finally, I filled them with soil and planted my little plants in them.
The result: I now have these colorful tin cans, filled with smiling green plants, on my balcony and kitchen counter. They give my home a rustic and colorful look. Every morning, I feel a refreshing sense of freshness when I look at them.
3. Jewelry Stand from Plastic Bottles
Junk: 2-litre plastic bottles of cold drinks and some CDs.
The story: All my earrings, bangles, and necklaces used to get mixed up in a small box. Whenever I had to wear something, it would take at least 10 minutes just to sort them out. I wanted a stand that could keep all my jewelry organized, but the ones available on the market seemed expensive and unwieldy.
My DIY Idea:
- I cut off the bottom of the plastic bottles. This round part is like a plate.
- Then I also cut out the middle part of the bottle and made stands of different heights.
- I glued these pieces together using old screws and Fevicol to create a multi-tier stand. I used a discarded CD (painted CD) for the base.
- I painted the entire stand with gold spray paint.
The result: my “waste material” jewelry stand is ready! It has multiple layers, keeping all my items separate and within easy reach. It now sits as a showpiece on my dressing table, saving me 10 minutes in the morning!
4. Broken Crockery Candle Holders
Junk: a cup with a broken handle and a small plate with a crack.
Story: These cups were part of my favorite tea set. When the handle broke, I felt terrible. I was about to throw it away when I suddenly thought of the candles used during Diwali. Why not use them for something with some emotional value?
My DIY Idea:
- Inside the broken cup I put all the candle making supplies (melted wax and wick).
- I broke the cracked plate into small pieces and (carefully!) glued them onto another old plate to give it a mosaic effect.
- When the candle froze, the cup with the broken handle took on a new and beautiful look.
The result: This cup has now become a beautiful candle holder, which I light in the evenings. It’s become a highlight of my dining table. It teaches me that not everything that’s “perfect” needs to be beautiful; even broken things can be wonderful.
5. Newspaper/Magazine Wall Art
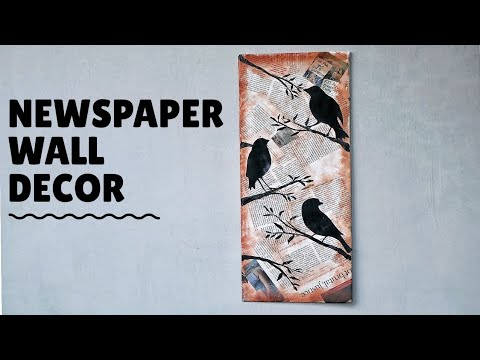
Junk: Old newspapers and pages of coloured magazines lying in the trash.
Story: One wall in my house felt very empty. I wanted a large art piece, but the art pieces on the market didn’t satisfy my creativity. I thought, why not use my own efforts and the paper I had lying around?
My DIY Idea:
- I cut pages from colored magazines into small triangles and squares.
- Rolled newspaper pages into thin sticks.
- Then these sticks were pasted on a cardboard base in a pattern, as if sun rays were coming out.
- By filling the colored pieces in the middle, it gave the form of abstract art.
The result: My empty wall is now adorned with colorful wall art I created. It’s my very own gallery, one that didn’t cost me a single penny. It’s the pride of my ‘Zero-Cost’ art project .
Conclusion: Change starts at home

Friends, the joy and satisfaction I get from these small DIY projects can’t be matched by buying a new expensive item. It’s not just about “turning trash into art,” it’s a small step toward making your living space and your mindset more sustainable .
Whenever you’re about to throw something away, stop and think: “Can I give this another chance?”
Believe me, every discarded object holds a new story and a new life. All it takes is a little creativity and love to find it.
So what junk are you going to turn into treasure next? Let me know in the comments!
Be happy, be creative and make your world a little greener!
This blog post is based on my personal experiences and my own creativity. DIY (do-it-yourself) projects can always be risky. Always practice safety when undertaking any upcycling or craft project, especially when using paint, glue, or sharp tools. Always allow children to perform these tasks under adult supervision. I am not responsible for any damage or injury that may occur while following these ideas. Results may vary depending on each individual’s skill and the materials used.
#DIYUpcycling#TrashToTreasure#BestOutOfWaste#EcoFriendlyDIY#SustainableLiving#JugaadFromTrash#DIYHomeDecor#ZeroWaste#DIYPlanters#DenimUpcycling#PlasticReuse#UpcycledDecor#OldClothesReuse#SaveEnvironment#GreenLiving#DIYTherapy